- Add your domain in your dashboard.
- Configure DNS settings on your domain provider.
- Allow time for DNS to propagate and TLS certificates to be automatically provisioned.
Looking to set up a subpath like
example.com/docs? See /docs subpath.Add your custom domain
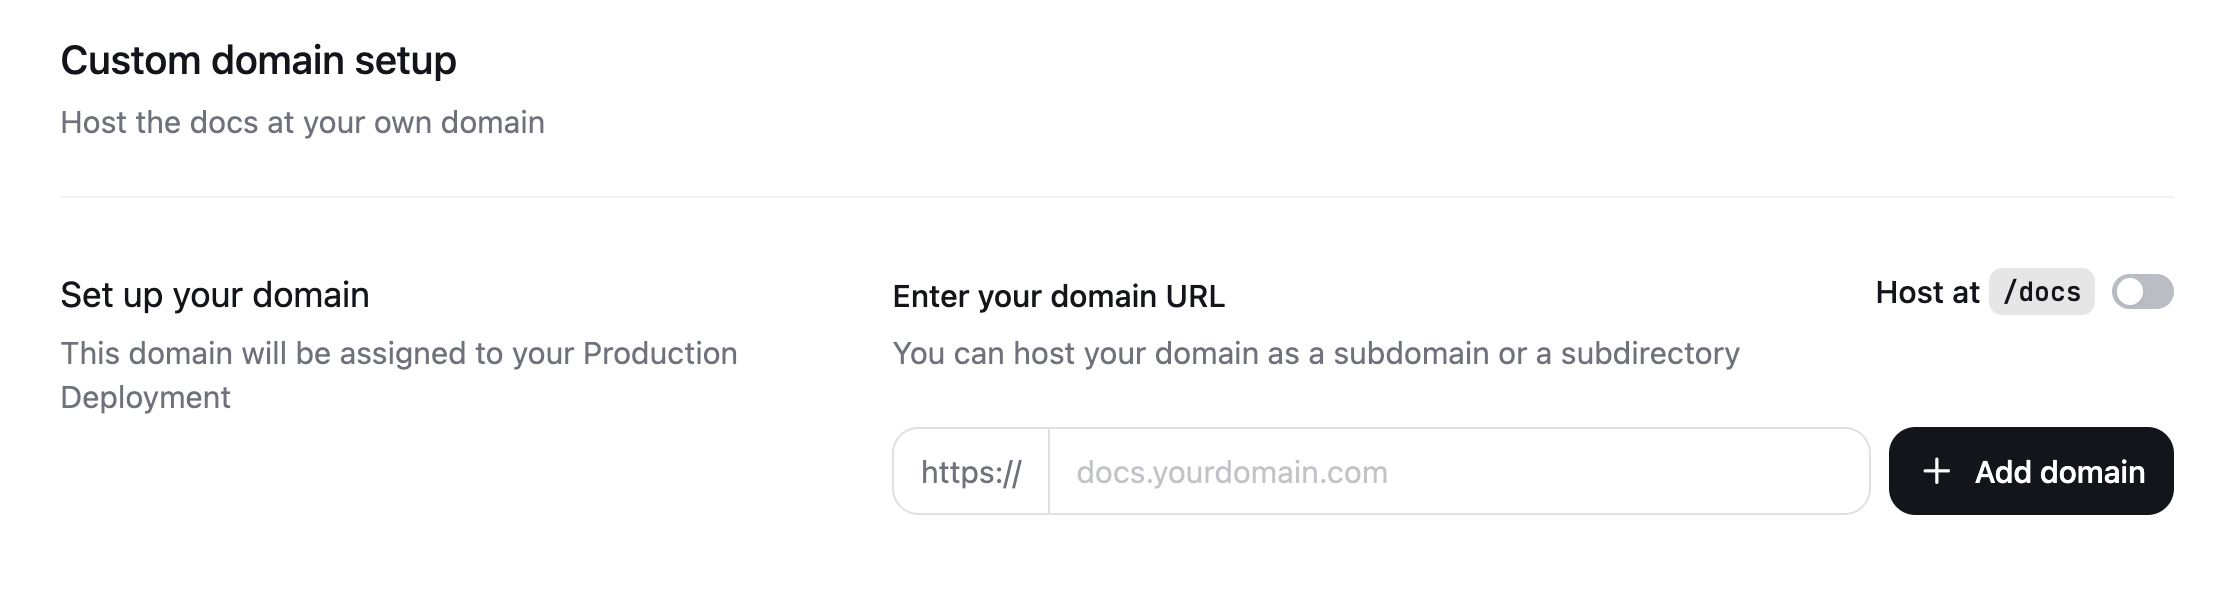
- Navigate to the Custom domain setup page in your dashboard.
- Enter your domain name. For example,
docs.example.comorwww.example.com. - Click Add domain.
Configure your DNS
- On your domain provider’s website, navigate to your domain’s DNS settings.
- Create a new DNS record with the following values:
DNS propagation
DNS changes typically take 1-24 hours to propagate globally, though it can take up to 48 hours in some cases. You can verify your DNS is configured correctly using DNSChecker. Once your DNS records are active, your documentation is first accessible via HTTP. HTTPS is available after Vercel provisions your TLS certificate.Automatic TLS provisioning
Once your DNS records propagate and resolve correctly, Vercel automatically provisions a free SSL/TLS certificate for your domain using Let’s Encrypt. This typically completes within a few hours of DNS propagation, though it can take up to 24 hours in rare cases. Certificates are automatically renewed before expiration.CAA records
If your domain uses CAA (Certification Authority Authorization) records, you must authorize Let’s Encrypt to issue certificates for your domain. Add the following CAA record to your DNS settings:Reserved paths
The/.well-known/acme-challenge path is reserved for certificate validation and cannot be redirected or rewritten. If you have configured redirects or rewrites for this path, certificate provisioning will fail.
DNS provider setup guides
Follow the step-by-step guide for your DNS provider to configure your custom domain.Cloudflare
Cloudflare
Step 1: Add CNAME record
- Log in to your Cloudflare dashboard.
- Select your domain from the list.
- Navigate to DNS > Records.
- Click Add record.
- Configure the record:
- Type:
CNAME - Name: Your subdomain (e.g.,
docsfordocs.example.com) - Target:
cname.mintlify-dns.com - Proxy status: Toggle to DNS only (gray cloud icon)
- TTL: Auto
- Type:
- Click Save.
Step 2: Configure SSL/TLS settings
- Navigate to SSL/TLS > Overview.
- Set encryption mode to Full (strict).
- Navigate to SSL/TLS > Edge Certificates.
- Scroll to Always Use HTTPS and ensure it is disabled.
Step 3: Verify CAA records (if applicable)
If you have CAA records configured:- Navigate to DNS > Records.
- Check for any CAA records.
- If CAA records exist, add a new CAA record:
- Type:
CAA - Name:
@(or your subdomain) - Tag:
issue - CA domain name:
letsencrypt.org
- Type:
- Click Save.
GoDaddy
GoDaddy
Step 1: Access DNS management
- Log in to your GoDaddy account.
- Navigate to My Products.
- Find your domain and click DNS.
Step 2: Add CNAME record
- Scroll to the Records section.
- Click Add (or Add New Record).
- Configure the record:
- Type: Select
CNAMEfrom the dropdown - Name: Your subdomain (e.g.,
docsfordocs.example.com) - Value:
cname.mintlify-dns.com - TTL: 1 hour (or default)
- Type: Select
- Click Save.
Step 3: Remove conflicting records
Check for existing A or CNAME records for the same subdomain:- Look for records with the same Name value.
- If found, click the pencil icon to edit or trash icon to delete.
- You cannot have both A and CNAME records for the same subdomain.
Step 4: Verify CAA records (if applicable)
If you have CAA records:- Scroll to the Records section.
- Click Add.
- Configure the record:
- Type:
CAA - Name:
@(for root) or your subdomain - Tag:
issue - Value:
letsencrypt.org
- Type:
- Click Save.
Namecheap
Namecheap
Step 1: Access DNS settings
- Log in to your Namecheap account.
- Navigate to Domain List.
- Click Manage next to your domain.
- Navigate to the Advanced DNS tab.
Step 2: Add CNAME record
- Scroll to Host Records.
- Click Add New Record.
- Configure the record:
- Type: Select
CNAME Recordfrom the dropdown - Host: Your subdomain (e.g.,
docsfordocs.example.com) - Value:
cname.mintlify-dns.com - TTL: Automatic
- Type: Select
- Click the green checkmark to save.
Step 3: Remove conflicting records
- Check for existing A or CNAME records with the same Host value.
- If found, click the trash icon to delete them.
- Click Save All Changes.
Step 4: Verify CAA records (if applicable)
If you have CAA records:- Click Add New Record.
- Configure the record:
- Type:
CAA Record - Host:
@or your subdomain - Tag:
issue - Value:
letsencrypt.org
- Type:
- Click the green checkmark to save.
AWS Route 53
AWS Route 53
Step 1: Access hosted zone
- Log in to the AWS Management Console.
- Navigate to Route 53 > Hosted zones.
- Select your domain’s hosted zone.
Step 2: Create CNAME record
- Click Create record.
- Configure the record:
- Record name: Your subdomain (e.g.,
docsfordocs.example.com) - Record type: Select
CNAMEfrom the dropdown - Value:
cname.mintlify-dns.com - TTL: 300 (or default)
- Routing policy: Simple routing
- Record name: Your subdomain (e.g.,
- Click Create records.
Step 3: Remove conflicting records
- Check for existing A or CNAME records with the same name.
- If found, select the record and click Delete record.
- Confirm the deletion.
Step 4: Add CAA record (if applicable)
If you have CAA records or want to add one:- Click Create record.
- Configure the record:
- Record name: Leave blank for root or enter subdomain
- Record type:
CAA - Value:
0 issue "letsencrypt.org" - TTL: 300
- Click Create records.
Vercel
Vercel
Step 1: Add verification TXT record
If Vercel is your domain provider, you must add a verification TXT record before the CNAME record. This information appears on your Mintlify dashboard after submitting your custom domain and is emailed to you.- Log in to your Vercel dashboard.
- Navigate to Domains.
- Select your domain.
- Click Add to create a new DNS record.
- Configure the verification record:
- Type:
TXT - Name: As provided by Mintlify
- Value: As provided by Mintlify
- Type:
- Click Save.
Step 2: Add CNAME record
- Click Add to create another DNS record.
- Configure the record:
- Type:
CNAME - Name: Your subdomain (e.g.,
docs) - Value:
cname.mintlify-dns.com
- Type:
- Click Save.
Step 3: Verify configuration
Return to your Mintlify dashboard to verify the domain configuration is complete.Other DNS providers
Other DNS providers
If your DNS provider is not listed above, follow these general steps:
Step 1: Locate DNS management
- Log in to your domain provider’s control panel.
- Find DNS settings (may be labeled as “DNS Management”, “Name Server Management”, “DNS Records”, or similar).
Step 2: Add CNAME record
Create a new DNS record with these values:- Type/Record Type:
CNAME - Host/Name/Subdomain: Your subdomain (e.g.,
docs) - Value/Target/Points to:
cname.mintlify-dns.com - TTL: Use default or 3600 seconds
Step 3: Remove conflicts
Delete any existing A or CNAME records for the same subdomain.Step 4: Add CAA record (if needed)
If you have CAA records, add:- Type:
CAA - Tag:
issue - Value:
letsencrypt.org
Subdomain vs root domain
Understanding the difference between subdomain and root domain setup helps you choose the right configuration for your documentation.Subdomain (recommended)
A subdomain is a prefix added to your main domain, such asdocs.example.com or help.example.com.
Advantages:
- Easier DNS configuration using CNAME records
- Better organization and separation of services
- More flexible for future changes
- Standard practice for documentation sites
cname.mintlify-dns.com.
Root domain (apex domain)
A root domain is your main domain without any prefix, such asexample.com.
Limitations:
- CNAME records cannot be used at the root level (DNS specification)
- Requires A records pointing to specific IP addresses
- Less flexible if infrastructure changes
- May conflict with email services (MX records)
Migrating from .mintlify.app to custom domain
Follow these steps to migrate your documentation from your.mintlify.app subdomain to a custom domain without downtime.
Step 1: Add your custom domain
- Navigate to the Custom domain setup page.
- Enter your custom domain (e.g.,
docs.example.com). - Click Add domain.
- Keep your
.mintlify.appdomain active during migration.
Step 2: Configure DNS
Follow the DNS provider setup guide for your provider to add the required CNAME record.Step 3: Wait for DNS propagation
- DNS changes typically take 1-24 hours to propagate.
- Verify DNS propagation using DNSChecker.
- Your documentation remains accessible via
.mintlify.appduring this time.
Step 4: Wait for SSL certificate
- After DNS propagates, Vercel automatically provisions an SSL/TLS certificate.
- This typically takes a few hours but can take up to 24 hours.
- Your custom domain becomes accessible via HTTPS once the certificate is issued.
Step 5: Set canonical URL
Update yourdocs.json to set your custom domain as the canonical URL:
Step 6: Update external links
Update links to your documentation in:- Your main website
- README files
- Email signatures
- Social media profiles
- Third-party integrations
Step 7: Set up redirects (optional)
Your.mintlify.app domain continues to work and automatically redirects to your custom domain. You can keep both active or remove the .mintlify.app domain from your dashboard if you prefer.
Troubleshooting
DNS propagation issues
Problem: DNS changes are not taking effect. Solutions:-
Check DNS configuration:
- Verify the CNAME record points to
cname.mintlify-dns.com - Ensure there are no typos in the subdomain or target
- Confirm there are no conflicting A or CNAME records
- Verify the CNAME record points to
-
Verify DNS propagation:
- Use DNSChecker to check global propagation
- Enter your full domain (e.g.,
docs.example.com) - Look for CNAME records pointing to
cname.mintlify-dns.com
-
Clear DNS cache:
- Flush your local DNS cache:
- Windows:
ipconfig /flushdns - macOS:
sudo dscacheutil -flushcache; sudo killall -HUP mDNSResponder - Linux:
sudo systemd-resolve --flush-caches
- Windows:
- Try accessing your domain in an incognito/private browser window
- Flush your local DNS cache:
-
Wait longer:
- DNS propagation can take up to 48 hours in rare cases
- Check back periodically rather than repeatedly refreshing
-
Check TTL settings:
- If you recently changed DNS records, the old TTL value determines how long old records are cached
- Wait for the previous TTL duration to expire
SSL/TLS certificate issues
Problem: Your custom domain shows a certificate error or is not accessible via HTTPS. Solutions:-
Verify DNS is propagated:
- SSL certificates cannot be issued until DNS is fully propagated
- Use DNSChecker to confirm DNS is resolving correctly worldwide
-
Check CAA records:
- If you have CAA records, ensure Let’s Encrypt is authorized
- Add a CAA record:
0 issue "letsencrypt.org" - Remove any CAA records that restrict certificate issuance
-
Verify Cloudflare settings (if applicable):
- Ensure SSL/TLS encryption mode is set to Full (strict)
- Disable Always Use HTTPS in Edge Certificates settings
- Confirm proxy status is set to DNS only (gray cloud)
-
Check for redirects:
- Ensure the
/.well-known/acme-challengepath is not redirected or rewritten - This path is required for Let’s Encrypt validation
- Ensure the
-
Wait for automatic provisioning:
- Certificate provisioning can take up to 24 hours after DNS propagates
- Vercel automatically retries if initial attempts fail
-
Contact support:
- If certificate issues persist after 24 hours, contact Mintlify support
- Provide your domain name and any error messages
Domain not resolving
Problem: Your custom domain shows a “domain not found” or similar error. Solutions:-
Verify domain is added in dashboard:
- Check the Custom domain setup page
- Ensure your domain is listed and shows as active
-
Check CNAME record:
- Verify the CNAME record exists in your DNS settings
- Confirm it points to
cname.mintlify-dns.com(note the trailing dot may be added automatically) - Ensure the subdomain matches what you entered in the dashboard
-
Remove conflicting records:
- Delete any A records for the same subdomain
- You cannot have both A and CNAME records for the same name
-
Verify nameservers:
- Ensure your domain is using the correct nameservers
- If you recently transferred your domain, nameserver changes can take 24-48 hours
-
Check domain status:
- Ensure your domain registration is active and not expired
- Verify your domain is not locked or suspended
Cloudflare-specific issues
Problem: Domain not working with Cloudflare as DNS provider. Solutions:-
Disable proxy (orange cloud):
- The CNAME record must have proxy status set to DNS only (gray cloud)
- Click the orange cloud icon to toggle it to gray
-
Set correct SSL/TLS mode:
- Navigate to SSL/TLS > Overview
- Set encryption mode to Full (strict)
-
Disable Always Use HTTPS:
- Navigate to SSL/TLS > Edge Certificates
- Scroll to Always Use HTTPS and toggle it off
- This prevents interference with Let’s Encrypt validation
-
Check Page Rules:
- Navigate to Rules > Page Rules
- Ensure no rules are redirecting or modifying your documentation subdomain
- Disable any rules that might interfere with certificate validation
-
Verify DNSSEC:
- If DNSSEC is enabled, ensure it’s properly configured
- Misconfigured DNSSEC can prevent DNS resolution
Mixed content warnings
Problem: Browser shows mixed content warnings or some resources fail to load. Solutions:-
Wait for SSL certificate:
- Ensure your SSL/TLS certificate is fully provisioned
- Access your site via
https://explicitly
-
Check canonical URL:
- Verify your canonical URL in
docs.jsonuseshttps:// - Update any
http://references tohttps://
- Verify your canonical URL in
-
Clear browser cache:
- Clear your browser cache and cookies
- Try accessing in an incognito/private window
Vercel verification issues
Problem: Vercel requires verification but the TXT record is not being recognized. Solutions:-
Verify TXT record format:
- Ensure you copied the exact verification value from Mintlify
- Check for extra spaces or characters
-
Wait for DNS propagation:
- TXT records also require time to propagate
- Use DNSChecker to verify TXT record propagation
-
Check record name:
- Ensure the TXT record name matches what Mintlify provided
- Some providers require
@for root domain, others require the full domain
-
Contact support:
- If verification fails after 24 hours, contact Mintlify support with your domain name
Set a canonical URL
After configuring your DNS, set a canonical URL to ensure search engines index your preferred domain. A canonical URL tells search engines which version of your documentation is the primary one. This improves SEO when your documentation is accessible from multiple URLs and prevents issues with duplicate content. Add thecanonical meta tag to your docs.json:
https://www.your-custom-domain-here.com with your actual custom domain. For example, if your custom domain is docs.mintlify.com, you would use: